| Prev | Next |
Encapsulation
Class and Object are two main building blocks of OO programs. Class is a blueprint that defines the structure and the operations allowed. In other words, class encapsulates attributes (fields) and operations (methods) that define how the attributes are to manipulated.
Objects are particular instances of the class. A class can be likened to a data type (although it is more than that) while the object can be likened to variable of that type. We will explain with a simple example from high school coordinate geometry.
Defining a class
Lets define a class Point.java for representing point in 2D space. A point in 2D space has 2 attributes: x-coordinate and y-coordinate. Lets use x and y for the same.
public class Point {
  private int x;  // x-coordinate
  private int y;  // y-coordinate
}
Now an object of Point class can be created using the following syntax.
Point p = new Point(); // meaning p is an instance of Point
- The keyword public implies Point class can be accessed from outside of this class.
- The keyword private for attibutes imply they can't be accessed from 'outside' of the class. i.e. one cannot access them by p.x = 2 or p.y = 3. Try doing this.
- 'public', 'protected' and 'private' are referred to as access specifiers or access modifiers. They are used to safeguard the attributes from improper direct access (also known as data hiding).
How to assign values for x and y?
- By defining special methods (setters) that assign values.
Defining setters - Assigning values to attributes
Lets define two methods to set the values of the attributes (setters).
public class Point {
  private int x;
  private int y;

  public void setX(int xCoord) {
    this.x = xCoord;    // The keyword 'this' can be omitted if there
  }                     // is no local variable with same name.

  public void setY(int yCoord) {
    this.y = yCoord;
  }
}
Now one can set the values for the attributes by using these setter methods.
      Point p = new Point();
      p.setX(2);
      p.setY(3);
One may have a single setter method that takes two integer arguments and assign them to the attributes x and y. There are no hard and fast rules to number of setter methods. It depends on the requirement. If x and y are modified together almost always, a single setter setXY(int xcoord, int ycoord) { ... } would do.
How does accessing the data values by a method provide security?
Let's say we want to restrict the value of the attribute x within the range 1 and 10. We can add an if condition in the setX() method to check the argument and decide to assign or throw an error.
Thus, the manner in which private attributes are modified can be controlled by appropriate methods.
The next question is how to access (or read) the values of these attributes.
Defining getters - Reading values of attributes
Getters are methods defined to return the values of the attributes. We define two methods getX() and getY() towards this end.
// Point.java

public class Point {
  private int x;
  private int y;

  public void setX(int xCoord) {
    this.x = xCoord;
  }

  public void setY(int yCoord) {
    this.y = yCoord;
  }

  public int getX() {
    return this.x;
  }

  public int getY() {
    return this.y;
  }
}
Now one can read the values and print them as follows.
      Point p = new Point();
      p.setX(2);
      p.setY(3);
      System.out.println("(" + p.getX() + "," + p.getY() + ")");
Typically we define a separate "test driver" class to instantiate Point, set, read and print them. This is to separate the definition of a class from its usage. Driver class code is given below.
// Driver.java

public class Driver {
  public static void main(String[] args) {
      Point p = new Point();
      p.setX(2);
      p.setY(3);
      System.out.println("(" + p.getX() + "," + p.getY() + ")");
  }
}
Notice that the Point class can be accessed from Driver.java because Point is public. Also we have to use setters to alter the attributes and getters to retrieve them. System.out.println() prints the point in (x,y) format.
Coding it in Eclipse
Step 1: Creating a project in Eclipse
- File → New → Java Project.
- Enter Geometry for Project Name.
- Click Next and Finish (or directly Finish).
If all goes well, you must see Geometry project visible in Package Explorer tab.
Step 2: Creating a Java class
- Right-click on Geometry project.
- Select New → Class.
- Enter Point for class name. (For now, uncheck all items in stubs section. You can explore them later.)
If all goes well, you must see Point.java appearing under Geometry project and the file is opened in the Eclipse editor with the following code.
public class Point {
}
Step 3: Write your code
Moving forward, you will practically write your code within this open and close braces. Add the attributes, the getter and setter definitions in this part.
If you have typed everything right, you will find no cross marks alongside your code. Eclipse checks for syntax as you type and highlights any errors (partial compilation) alongside the code. For example, in the following code you can see that two syntax errors are highlighted.
- Typo in 'publi' at line number 11.
- Missing opening brace '{' at line number 20.
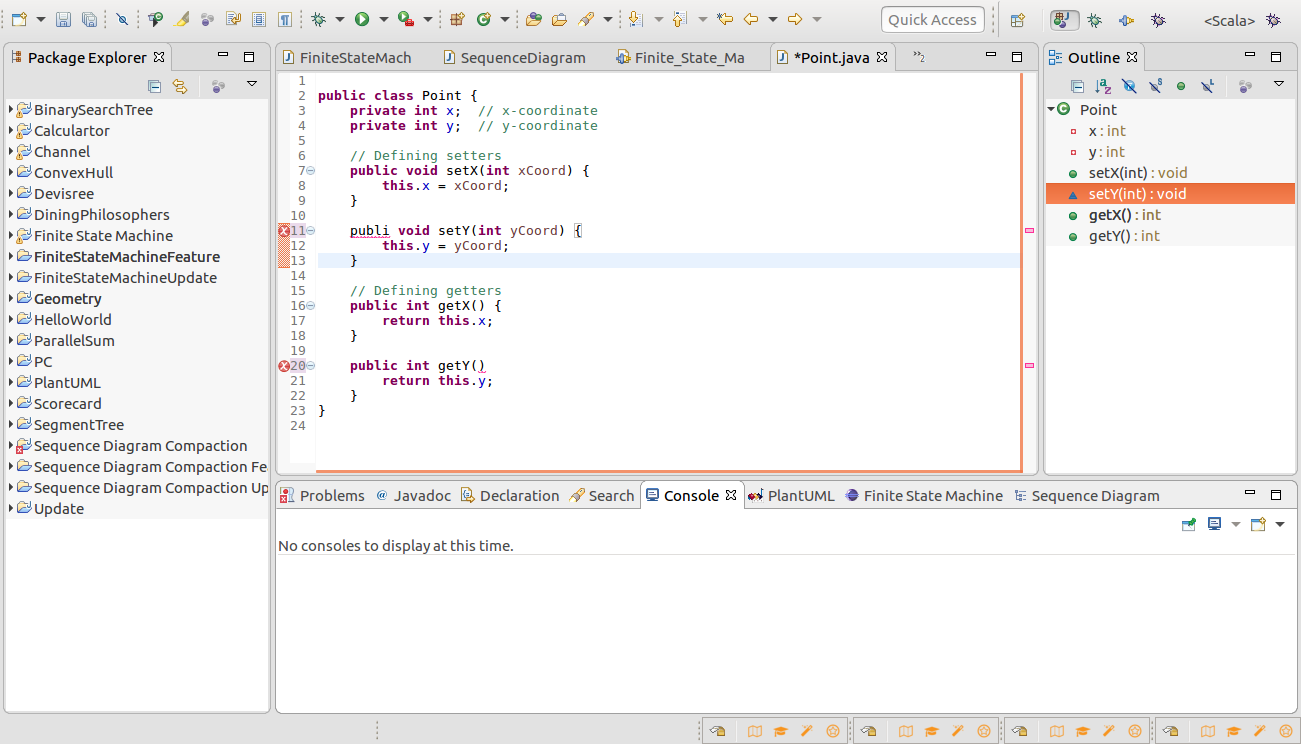
By hovering the mouse pointer over the cross, the error message (and suggested fix) will be highlighted.
Eclipse has several features such as this to aid faster development. You can observe that the keywords are automatically highlighted. As you type, autocomplete feature helps you to complete the keywords and library calls.
Step 4: Creating a Test Driver
Follow steps similar to steps 2 and 3 above to create Driver.java and include the code given above.
Step 5: Compiling and Execution
1. Right-click 'Driver.java' in package explorer.
2. Select Run.
3. The output will be printed in the Console window. In this case: (2,3)
Only the class that contains main() can be executed. In this case "Driver". Since Point is a public class and is in same folder, JVM automatically loads it during execution.
By moving main() method inside Point class (not recommended since we want to keep the implementation separate from usage), one may right-click Point.java and select Run.
Defining printers - printing the output
You may also implement a separate method print() in Point to print the attribute values. Since the print() method is defined inside the Point class, the attributes can be directly accessed with this.x or just x instead of using getX().
    public void print() {
      System.out.println("(" + this.x + "," + this.y + ")");
    }
Now, in the Driver class you may call this method to print the fraction.
    Point p = new Point();
    p.setX(2);
    p.setY(3);
    p.print();
Points to note
1. Make it a habit to safeguard the attributes using the access specifiers 'private' (or protected) and define getters and setters to access them.
It may be tempting to include a print statement in getters. This should be avoided since printing is essentially different from retrieving. In the OO world, you are not expected to mixup functionalities. Also, for each functionality, you define a separate method (no matter how small a functionality may be).
Note: A class in an object oriented program is characterized by a large number of smaller methods operating around its data.
2. What happens if you print a Point object?
In the test driver code, lets say you print the Point object as below
    Point p = new Point();
    p.setX(2);
    p.setY(3);
    System.out.println(p);
You will see an output similar to the one below.
Point@aeb2ni7eo8c
This is because p refers to the JVM address that contains the data and not the data itself. There is an important consequence due to this: When you want to compare 2 Point objects for equality, i.e. if (p1 == p2), it will return false always even if x and y attributes are the same.
public class Driver {
	public static void main(String[] args) {
		Point p1 = new Point();
		p1.setX(2);
		p1.setY(3);

		Point p2 = new Point();
		p2.setX(2);
		p2.setY(3);

		if (p1 == p2)	// p1 and p2 are different JVM references
			System.out.println("Same");	// This line will never be executed
		else
			System.out.println("Different"); // This line is always executed
	}
}
While your intention may be to check if x and y values of p1 and p2 match, the if condition merely compares two JVM addresses which will obviously be different.
We will address this later.